[TOC]
Transactional
简介
源码分析
从事务如何生效开始
大家都知道Spring的事务是基于AOP完成的,那么我们就从这个AOP说起。
假设一个例子:
类A:
// 省去Bean管理
public class A {

    @Transactional
    public void test(){
    }

}
调用类:
// 省去Bean管理
public class B {

    private A a;

    public void test(){
    	a.test();
    }

}
那么此时调用a.test(),会被代理一层,其中a是代理类,代理类很长,但是目的是代理方法,我们只要关注被代理的方法即可,即:test()。
//...省略不重要的方法,下文同此,不在说明

public class A$$EnhancerBySpringCGLIB$$21771092 extends A implements SpringProxy, Advised, Factory {
    private boolean CGLIB$BOUND;
    public static Object CGLIB$FACTORY_DATA;
    private static final ThreadLocal CGLIB$THREAD_CALLBACKS;
    private static final Callback[] CGLIB$STATIC_CALLBACKS;
    private MethodInterceptor CGLIB$CALLBACK_0;
    private MethodInterceptor CGLIB$CALLBACK_1;
    private NoOp CGLIB$CALLBACK_2;
    private Dispatcher CGLIB$CALLBACK_3;
    private Dispatcher CGLIB$CALLBACK_4;
    private MethodInterceptor CGLIB$CALLBACK_5;
    private MethodInterceptor CGLIB$CALLBACK_6;
    private static Object CGLIB$CALLBACK_FILTER;
    private static final Method CGLIB$test$0$Method;
    private static final MethodProxy CGLIB$test$0$Proxy;
    private static final Object[] CGLIB$emptyArgs;
    private static final Method CGLIB$equals$1$Method;
    private static final MethodProxy CGLIB$equals$1$Proxy;
    private static final Method CGLIB$toString$2$Method;
    private static final MethodProxy CGLIB$toString$2$Proxy;
    private static final Method CGLIB$hashCode$3$Method;
    private static final MethodProxy CGLIB$hashCode$3$Proxy;
    private static final Method CGLIB$clone$4$Method;
    private static final MethodProxy CGLIB$clone$4$Proxy;

    //...

    // 被代理的目标方法
    public final void test() {
        // 获取MethodInterceptor
        MethodInterceptor var10000 = this.CGLIB$CALLBACK_0;
        if (var10000 == null) {
            // 获取MethodInterceptor
            CGLIB$BIND_CALLBACKS(this);
            var10000 = this.CGLIB$CALLBACK_0;
        }

        // 通过Debug得知此时的实现是org.springframework.aop.framework.CglibAopProxy.DynamicAdvisedInterceptor
        if (var10000 != null) {
            // 调用intercept
            var10000.intercept(this, CGLIB$test$0$Method, CGLIB$emptyArgs, CGLIB$test$0$Proxy);
        } else {
            super.test();
        }
    }

    //...
}
通过上述代理类,我们得知了:代理类主要目的是为了执行org.springframework.aop.framework.CglibAopProxy.DynamicAdvisedInterceptor#intercept方法,那么接下来我们直接从这个方法往下看:
/**
 * General purpose AOP callback. Used when the target is dynamic or when the
 * proxy is not frozen.
 */
private static class DynamicAdvisedInterceptor implements MethodInterceptor, Serializable {

   private final AdvisedSupport advised;

   public DynamicAdvisedInterceptor(AdvisedSupport advised) {
      this.advised = advised;
   }

   @Override
   @Nullable
   public Object intercept(Object proxy, Method method, Object[] args, MethodProxy methodProxy) throws Throwable {
      Object oldProxy = null;
      boolean setProxyContext = false;
      Object target = null;
      TargetSource targetSource = this.advised.getTargetSource();
      try {
         if (this.advised.exposeProxy) {
            // Make invocation available if necessary.
            oldProxy = AopContext.setCurrentProxy(proxy);
            setProxyContext = true;
         }
         // Get as late as possible to minimize the time we "own" the target, in case it comes from a pool...
         target = targetSource.getTarget();
         Class<?> targetClass = (target != null ? target.getClass() : null);
         // 获取目标方法的拦截链
         List<Object> chain = this.advised.getInterceptorsAndDynamicInterceptionAdvice(method, targetClass);
         Object retVal;
         // Check whether we only have one InvokerInterceptor: that is,
         // no real advice, but just reflective invocation of the target.
         if (chain.isEmpty() && Modifier.isPublic(method.getModifiers())) {
            // We can skip creating a MethodInvocation: just invoke the target directly.
            // Note that the final invoker must be an InvokerInterceptor, so we know
            // it does nothing but a reflective operation on the target, and no hot
            // swapping or fancy proxying.
            Object[] argsToUse = AopProxyUtils.adaptArgumentsIfNecessary(method, args);
            retVal = methodProxy.invoke(target, argsToUse);
         }
         else {
            // We need to create a method invocation...
            // 创建一个方法调用器,并且调用
            retVal = new CglibMethodInvocation(proxy, target, method, args, targetClass, chain, methodProxy).proceed();
         }
         retVal = processReturnType(proxy, target, method, retVal);
         return retVal;
      }
      finally {
         if (target != null && !targetSource.isStatic()) {
            targetSource.releaseTarget(target);
         }
         if (setProxyContext) {
            // Restore old proxy.
            AopContext.setCurrentProxy(oldProxy);
         }
      }
   }

   //...
}
从代理类开始,整理下调用链路:
A$$EnhancerBySpringCGLIB$$21771092->DynamicAdvisedInterceptor: intercept
DynamicAdvisedInterceptor->CglibMethodInvocation: proceed
CglibMethodInvocation->TransactionInterceptor: invoke
上图中主要展示了A\(EnhancerBySpringCGLIB\)21771092、DynamicAdvisedInterceptor、CglibMethodInvocation、TransactionInterceptor这4个类:
-
A\(EnhancerBySpringCGLIB\)21771092
Aop生成的代理类
-
DynamicAdvisedInterceptor
General purpose AOP callback. Used when the target is dynamic or when the proxy is not frozen.
通用 AOP 回调。当目标为动态的或者代理不被禁用时使用。为CglibAopProxy的静态内部类。
-
CglibMethodInvocation
Implementation of AOP Alliance MethodInvocation used by this AOP proxy.
此 AOP 代理使用的 AOP Alliance MethodInvocation 的实现。为CglibAopProxy的静态内部类。
-
TransactionInterceptor
AOP Alliance MethodInterceptor for declarative transaction management using the common Spring transaction infrastructure (PlatformTransactionManager). Derives from the TransactionAspectSupport class which contains the integration with Spring’s underlying transaction API. TransactionInterceptor simply calls the relevant superclass methods such as invokeWithinTransaction in the correct order.
AOP Alliance MethodInterceptor 使用通用 Spring 事务基础结构 (PlatformTransactionManager) 进行声明式事务管理。 派生自 TransactionAspectSupport 类,该类包含与 Spring 的底层事务 API 的集成。 TransactionInterceptor 只是以正确的顺序调用相关的超类方法,例如 invokeWithinTransaction。
最终调用org.springframework.transaction.interceptor.TransactionInterceptor#invoke,看到这里终于开始有事务的影子了,我们继续往下看:
@Override
@Nullable
public Object invoke(MethodInvocation invocation) throws Throwable {
    // Work out the target class: may be {@code null}.
    // The TransactionAttributeSource should be passed the target class
    // as well as the method, which may be from an interface.
    Class<?> targetClass = (invocation.getThis() != null ? AopUtils.getTargetClass(invocation.getThis()) : null);

    // Adapt to TransactionAspectSupport's invokeWithinTransaction...
    // 调用TransactionAspectSupport的invokeWithinTransaction方法
    return invokeWithinTransaction(invocation.getMethod(), targetClass, invocation::proceed);
}
这边的代码大家一看就懂,无非就是获取目标Class对象,然后继续调用invokeWithinTransaction,在继续往下看之前,我们先看下类图:
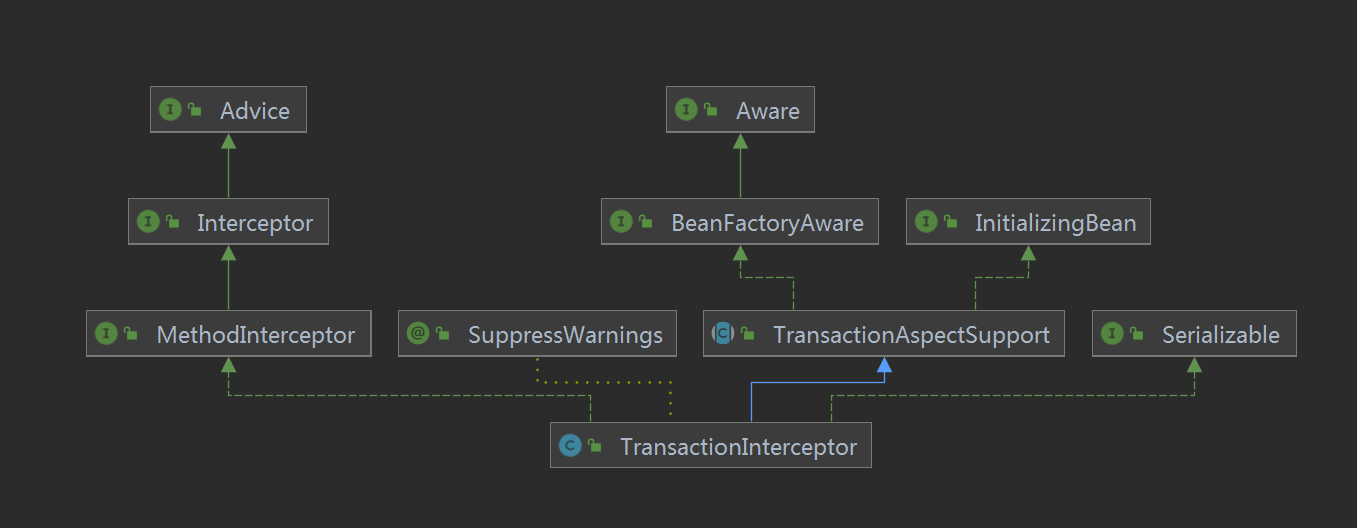
- TransactionAspectSupport:实现了Spring事务基础架构,为任何后续的实现提供了基础。
TransactionInterceptor继承TransactionAspectSupport,而invokeWithinTransaction是TransactionAspectSupport的方法。下面,我们继续分析invokeWithinTransaction方法:(这个方法有点长,我将大致的代码思路备注在源码中)
/**
 * General delegate for around-advice-based subclasses, delegating to several other template
 * methods on this class. Able to handle {@link CallbackPreferringPlatformTransactionManager}
 * as well as regular {@link PlatformTransactionManager} implementations.
 * @param method the Method being invoked
 * @param targetClass the target class that we're invoking the method on
 * @param invocation the callback to use for proceeding with the target invocation
 * @return the return value of the method, if any
 * @throws Throwable propagated from the target invocation
 */
@Nullable
protected Object invokeWithinTransaction(Method method, @Nullable Class<?> targetClass,
      final InvocationCallback invocation) throws Throwable {

   // If the transaction attribute is null, the method is non-transactional.
   TransactionAttributeSource tas = getTransactionAttributeSource();
   final TransactionAttribute txAttr = (tas != null ? tas.getTransactionAttribute(method, targetClass) : null);
   // 根据txAttr决定使用的TransactionManager
   final TransactionManager tm = determineTransactionManager(txAttr);

   if (this.reactiveAdapterRegistry != null && tm instanceof ReactiveTransactionManager) {
      ReactiveTransactionSupport txSupport = this.transactionSupportCache.computeIfAbsent(method, key -> {
         if (KotlinDetector.isKotlinType(method.getDeclaringClass()) && KotlinDelegate.isSuspend(method)) {
            throw new TransactionUsageException(
                  "Unsupported annotated transaction on suspending function detected: " + method +
                  ". Use TransactionalOperator.transactional extensions instead.");
         }
         ReactiveAdapter adapter = this.reactiveAdapterRegistry.getAdapter(method.getReturnType());
         if (adapter == null) {
            throw new IllegalStateException("Cannot apply reactive transaction to non-reactive return type: " +
                  method.getReturnType());
         }
         return new ReactiveTransactionSupport(adapter);
      });
      return txSupport.invokeWithinTransaction(
            method, targetClass, invocation, txAttr, (ReactiveTransactionManager) tm);
   }

   // 将TransactionManager转化为PlatformTransactionManager
   PlatformTransactionManager ptm = asPlatformTransactionManager(tm);
    // 切点方法名
   final String joinpointIdentification = methodIdentification(method, targetClass, txAttr);

   if (txAttr == null || !(ptm instanceof CallbackPreferringPlatformTransactionManager)) {
      // Standard transaction demarcation with getTransaction and commit/rollback calls.
      // 如果有必要,则开启事务(底层创建事务)
      TransactionInfo txInfo = createTransactionIfNecessary(ptm, txAttr, joinpointIdentification);

      Object retVal;
      try {
         // This is an around advice: Invoke the next interceptor in the chain.
         // This will normally result in a target object being invoked.
         // 执行目标方法
         retVal = invocation.proceedWithInvocation();
      }
      catch (Throwable ex) {
         // target invocation exception
         // 抛异常时,回滚事务
         completeTransactionAfterThrowing(txInfo, ex);
         throw ex;
      }
      finally {
         // 清除当前线程的事务信息(底层使用ThreadLocal记录的线程的事务信息)
         cleanupTransactionInfo(txInfo);
      }

      if (vavrPresent && VavrDelegate.isVavrTry(retVal)) {
         // Set rollback-only in case of Vavr failure matching our rollback rules...
         TransactionStatus status = txInfo.getTransactionStatus();
         if (status != null && txAttr != null) {
            retVal = VavrDelegate.evaluateTryFailure(retVal, txAttr, status);
         }
      }
      // 提交事务
      commitTransactionAfterReturning(txInfo);
      return retVal;
   }

   else {
      final ThrowableHolder throwableHolder = new ThrowableHolder();

      // It's a CallbackPreferringPlatformTransactionManager: pass a TransactionCallback in.
      try {
         Object result = ((CallbackPreferringPlatformTransactionManager) ptm).execute(txAttr, status -> {
            // 准备txInfo
            TransactionInfo txInfo = prepareTransactionInfo(ptm, txAttr, joinpointIdentification, status);
            try {
               // 调用调用链中下一个interceptor:此时我们的事务方法也在此处链中被执行
               Object retVal = invocation.proceedWithInvocation();
               if (vavrPresent && VavrDelegate.isVavrTry(retVal)) {
                  // Set rollback-only in case of Vavr failure matching our rollback rules...
                  retVal = VavrDelegate.evaluateTryFailure(retVal, txAttr, status);
               }
               return retVal;
            }
            catch (Throwable ex) {
               if (txAttr.rollbackOn(ex)) {
                  // A RuntimeException: will lead to a rollback.
                  if (ex instanceof RuntimeException) {
                     throw (RuntimeException) ex;
                  }
                  else {
                     throw new ThrowableHolderException(ex);
                  }
               }
               else {
                  // A normal return value: will lead to a commit.
                  throwableHolder.throwable = ex;
                  return null;
               }
            }
            finally {
               // 清除事务信息(底层使用ThreadLocal记录的事务信息)
               cleanupTransactionInfo(txInfo);
            }
         });

         // Check result state: It might indicate a Throwable to rethrow.
         if (throwableHolder.throwable != null) {
            throw throwableHolder.throwable;
         }
         return result;
      }
      catch (ThrowableHolderException ex) {
         throw ex.getCause();
      }
      catch (TransactionSystemException ex2) {
         if (throwableHolder.throwable != null) {
            logger.error("Application exception overridden by commit exception", throwableHolder.throwable);
            ex2.initApplicationException(throwableHolder.throwable);
         }
         throw ex2;
      }
      catch (Throwable ex2) {
         if (throwableHolder.throwable != null) {
            logger.error("Application exception overridden by commit exception", throwableHolder.throwable);
         }
         throw ex2;
      }
   }
}
看完了上述的这个方法,对整个事务的流程也有个大致了解,无非就是那套:
// 以下为伪代码
// 开启事务
begin transaction

try{
   // 业务操作
   do business
} catch(E e){
   // 异常后回滚
   rollback

   throw e;
}

// 提交事务
commit
此时,我们有以下几个疑问:
- 事务有传播性,这是如何实现的?
- 事务是数据库实现的,开启事务还得依赖数据库,那么操作数据库开启事务的代码在哪里?
- 数据库有很多种,如何区分的呢?
带着问题我们先看开启事务这部分的源码TransactionInfo txInfo = createTransactionIfNecessary(ptm, txAttr, joinpointIdentification);:
protected TransactionInfo createTransactionIfNecessary(@Nullable PlatformTransactionManager tm,
      @Nullable TransactionAttribute txAttr, final String joinpointIdentification) {

   // If no name specified, apply method identification as transaction name.
   if (txAttr != null && txAttr.getName() == null) {
      txAttr = new DelegatingTransactionAttribute(txAttr) {
         @Override
         public String getName() {
            return joinpointIdentification;
         }
      };
   }

   TransactionStatus status = null;
   if (txAttr != null) {
      if (tm != null) {
         // 获取事务
         status = tm.getTransaction(txAttr);
      }
      else {
         if (logger.isDebugEnabled()) {
            logger.debug("Skipping transactional joinpoint [" + joinpointIdentification +
                  "] because no transaction manager has been configured");
         }
      }
   }
   // 准备事务信息
   return prepareTransactionInfo(tm, txAttr, joinpointIdentification, status);
}
首先来看下获取事务,方法位于AbstractPlatformTransactionManager中:
@Override
public final TransactionStatus getTransaction(@Nullable TransactionDefinition definition)
      throws TransactionException {

   // Use defaults if no transaction definition given.
   // 如果未定义,则使用默认值
   TransactionDefinition def = (definition != null ? definition : TransactionDefinition.withDefaults());

   Object transaction = doGetTransaction();
   boolean debugEnabled = logger.isDebugEnabled();

   // 是否已经存在事务
   if (isExistingTransaction(transaction)) {
      // Existing transaction found -> check propagation behavior to find out how to behave.
      // 已经存在事务 -> 检查传播行为以了解如何继续
      return handleExistingTransaction(def, transaction, debugEnabled);
   }

   // Check definition settings for new transaction.
   if (def.getTimeout() < TransactionDefinition.TIMEOUT_DEFAULT) {
      throw new InvalidTimeoutException("Invalid transaction timeout", def.getTimeout());
   }

   // No existing transaction found -> check propagation behavior to find out how to proceed.
   // 未找到现有事务 -> 检查传播行为以了解如何继续
   if (def.getPropagationBehavior() == TransactionDefinition.PROPAGATION_MANDATORY) {
      // 未找到现有事务,事务传播行为为PROPAGATION_MANDATORY,则抛出异常(因为PROPAGATION_MANDATORY表示,当前方法执行必须在事务内,没有则抛异常)
      throw new IllegalTransactionStateException(
            "No existing transaction found for transaction marked with propagation 'mandatory'");
   }
   else if (def.getPropagationBehavior() == TransactionDefinition.PROPAGATION_REQUIRED ||
         def.getPropagationBehavior() == TransactionDefinition.PROPAGATION_REQUIRES_NEW ||
         def.getPropagationBehavior() == TransactionDefinition.PROPAGATION_NESTED) {
      // 挂起资源
      SuspendedResourcesHolder suspendedResources = suspend(null);
      if (debugEnabled) {
         logger.debug("Creating new transaction with name [" + def.getName() + "]: " + def);
      }
      try {
         // 开启事务
         return startTransaction(def, transaction, debugEnabled, suspendedResources);
      }
      catch (RuntimeException | Error ex) {
         resume(null, suspendedResources);
         throw ex;
      }
   }
   else {
      // Create "empty" transaction: no actual transaction, but potentially synchronization.
      // 创建“空”事务:没有实际事务,但可能是同步的
      if (def.getIsolationLevel() != TransactionDefinition.ISOLATION_DEFAULT && logger.isWarnEnabled()) {
         logger.warn("Custom isolation level specified but no actual transaction initiated; " +
               "isolation level will effectively be ignored: " + def);
      }
      boolean newSynchronization = (getTransactionSynchronization() == SYNCHRONIZATION_ALWAYS);
      return prepareTransactionStatus(def, null, true, newSynchronization, debugEnabled, null);
   }
}
从上述方法中,我们发现,Spring的事务传播性在getTransaction得到实现,下面继续看开启事务方法startTransaction,
private TransactionStatus startTransaction(TransactionDefinition definition, Object transaction,
      boolean debugEnabled, @Nullable SuspendedResourcesHolder suspendedResources) {
   boolean newSynchronization = (getTransactionSynchronization() != SYNCHRONIZATION_NEVER);
   // 根据给定的参数,创建一个TransactionStatus实例
   DefaultTransactionStatus status = newTransactionStatus(
         definition, transaction, true, newSynchronization, debugEnabled, suspendedResources);
   // 开启一个新的事务
   doBegin(transaction, definition);
   // 根据需要初始化事务同步
   prepareSynchronization(status, definition);
   return status;
}
很明显doBegin是具体开启事务的入口,doBegin为抽象类AbstractPlatformTransactionManager的抽象方法,我们看看Javadoc的注释:
	/**
	 * Begin a new transaction with semantics according to the given transaction
	 * definition. Does not have to care about applying the propagation behavior,
	 * as this has already been handled by this abstract manager.
	 * <p>This method gets called when the transaction manager has decided to actually
	 * start a new transaction. Either there wasn't any transaction before, or the
	 * previous transaction has been suspended.
	 * <p>A special scenario is a nested transaction without savepoint: If
	 * {@code useSavepointForNestedTransaction()} returns "false", this method
	 * will be called to start a nested transaction when necessary. In such a context,
	 * there will be an active transaction: The implementation of this method has
	 * to detect this and start an appropriate nested transaction.
	 * @param transaction the transaction object returned by {@code doGetTransaction}
	 * @param definition a TransactionDefinition instance, describing propagation
	 * behavior, isolation level, read-only flag, timeout, and transaction name
	 * @throws TransactionException in case of creation or system errors
	 * @throws org.springframework.transaction.NestedTransactionNotSupportedException
	 * if the underlying transaction does not support nesting
	 */
	protected abstract void doBegin(Object transaction, TransactionDefinition definition)
			throws TransactionException;
原文翻译如下:
根据给定的事务定义开始一个具有语义的新事务。不必关心应用传播行为,因为这已经由这个抽象管理器处理了。 当事务管理器决定实际开始一个新事务时,将调用此方法。要么之前没有任何事务,要么之前的事务已被暂停。 一个特殊的场景是没有保存点的嵌套事务:如果 useSavepointForNestedTransaction() 返回“false”,则将在必要时调用此方法以启动嵌套事务。在这样的上下文中,将有一个活动事务:此方法的实现必须检测到这一点并启动一个适当的嵌套事务。
白话文:
挑重点看,原文中说会开启一个新的事务,切无需关心底层实现。大致可以猜到此接口将会由不同的事务管理器进行实现,且都内聚了数据库开启事务的具体操作。
大家都知道,咱们用的事务管理器最常见的属DataSourceTransactionManager,下面就以它的实现为例,来继续分析:
@Override
protected void doBegin(Object transaction, TransactionDefinition definition) {
    DataSourceTransactionObject txObject = (DataSourceTransactionObject) transaction;
    Connection con = null;

    try {
        // 当前线程上下文没有连接器 或者 当前线程上下文的连接器为同步的
        if (!txObject.hasConnectionHolder() ||
            txObject.getConnectionHolder().isSynchronizedWithTransaction()) {
            // 获取DataSource后,在获取Connection对象
            Connection newCon = obtainDataSource().getConnection();
            if (logger.isDebugEnabled()) {
                logger.debug("Acquired Connection [" + newCon + "] for JDBC transaction");
            }
            // 设置当前线程连接器上下文
            txObject.setConnectionHolder(new ConnectionHolder(newCon), true);
        }
        // 将资源标记为与事务同步
        txObject.getConnectionHolder().setSynchronizedWithTransaction(true);
        // 获取连接
        con = txObject.getConnectionHolder().getConnection();

        Integer previousIsolationLevel = DataSourceUtils.prepareConnectionForTransaction(con, definition);
        txObject.setPreviousIsolationLevel(previousIsolationLevel);
        txObject.setReadOnly(definition.isReadOnly());

        // Switch to manual commit if necessary. This is very expensive in some JDBC drivers,
        // so we don't want to do it unnecessarily (for example if we've explicitly
        // configured the connection pool to set it already).
        if (con.getAutoCommit()) {
            txObject.setMustRestoreAutoCommit(true);
            if (logger.isDebugEnabled()) {
                logger.debug("Switching JDBC Connection [" + con + "] to manual commit");
            }
            con.setAutoCommit(false);
        }

        prepareTransactionalConnection(con, definition);
        txObject.getConnectionHolder().setTransactionActive(true);

        int timeout = determineTimeout(definition);
        if (timeout != TransactionDefinition.TIMEOUT_DEFAULT) {
            txObject.getConnectionHolder().setTimeoutInSeconds(timeout);
        }

        // Bind the connection holder to the thread.
        if (txObject.isNewConnectionHolder()) {
            TransactionSynchronizationManager.bindResource(obtainDataSource(), txObject.getConnectionHolder());
        }
    }

    catch (Throwable ex) {
        if (txObject.isNewConnectionHolder()) {
            // 释放连接
            DataSourceUtils.releaseConnection(con, obtainDataSource());
            // 清空当前线程的连接器上下文
            txObject.setConnectionHolder(null, false);
        }
        throw new CannotCreateTransactionException("Could not open JDBC Connection for transaction", ex);
    }
}
核心逻辑 Connection newCon = obtainDataSource().getConnection();,数据库连接的获取就在此处,由于接口DataSource的实现较多,我们不再往下继续展示源码逻辑。
看完了源码,为了更清晰的展示事务的核心逻辑,我们用代码调用链画出源码逻辑:
Tips: 假设数据库连接池选用Druid实现,其他连接池实现大抵相似。
TransactionAspectSupport->TransactionAspectSupport: createTransactionIfNecessary
TransactionAspectSupport->DataSourceTransactionManager: getTransaction
DataSourceTransactionManager->DataSourceTransactionManager: doGetTransaction
DataSourceTransactionManager->DataSourceTransactionManager: startTransaction
DataSourceTransactionManager->DataSourceTransactionManager: newTransactionStatus
DataSourceTransactionManager->DataSourceTransactionManager: doBegin
DataSourceTransactionManager->DruidDataSource: getConnection
DataSourceTransactionManager->DataSourceTransactionObject: setConnectionHolder
DataSourceTransactionManager->DataSourceTransactionObject: setReadOnly(definition.isReadOnly())
DataSourceTransactionManager->DataSourceTransactionObject: ...
DataSourceTransactionManager->DataSourceTransactionManager: prepareSynchronization

TransactionAspectSupport->TransactionAspectSupport: prepareTransactionInfo
上图中主要展示了TransactionAspectSupport、DataSourceTransactionManager、DruidDataSource、DataSourceTransactionObject这4个类:
-
TransactionAspectSupport
主要实现了事务的Aop逻辑,不涉及事务实现的细节
-
DataSourceTransactionManager
继承了AbstractPlatformTransactionManager,实现了接口PlatformTransactionManager,主要封装了事务实现细节,但与数据库的连接等操作,依赖于接口DataSource的实现。
-
AbstractPlatformTransactionManager
Abstract base class that implements Spring’s standard transaction workflow, serving as basis for concrete platform transaction managers
实现Spring的标准事务工作流的抽象基类,用作具体平台事务管理器的基础
-
PlatformTransactionManager
This is the central interface in Spring’s transaction infrastructure. Applications can use this directly, but it is not primarily meant as API: Typically, applications will work with either TransactionTemplate or declarative transaction demarcation through AOP.
这是Spring事务基础架构中的中央接口。应用程序可以直接使用它,但是它并不是主要用于API:通常,应用程序可以通过Transaction模板或通过AOP进行声明式事务划分来使用。
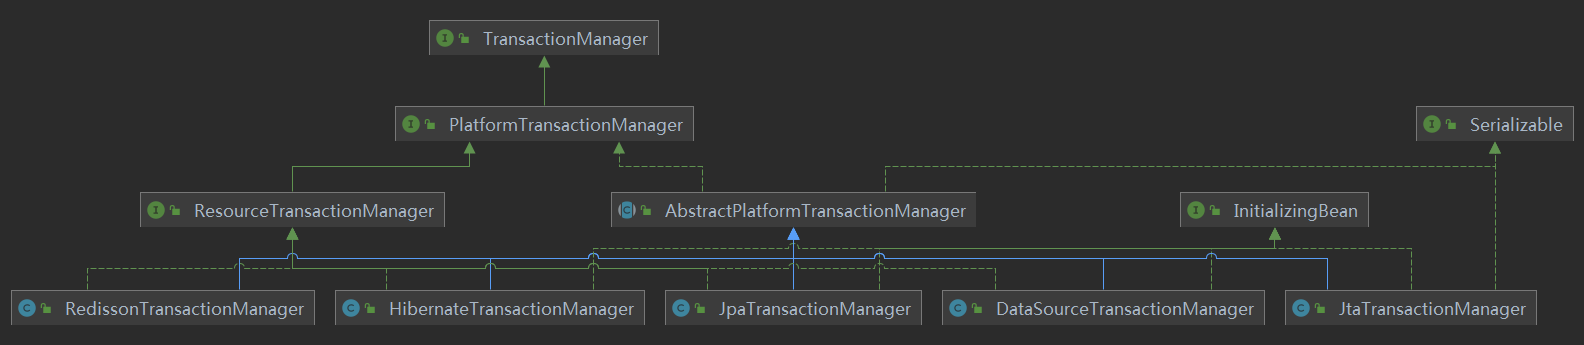
当然,Spring中肯定不会仅仅有DataSourceTransactionManager这一个实现,她还有HibernateTransactionManager、JpaTransactionManager等等实现,我们大致看下类图,至于各自实现的细节,不在本篇文章中描述(下图中也是部分):
-
-
DataSourceTransactionObject
为DataSourceTransactionManager的静态内部类,被DataSourceTransactionManager所使用,为了保存Connection并操作其方法。
-
DruidDataSource
Druid数据源,继承了DruidAbstractDataSource,实现了接口DataSource,封装了和数据库的交互逻辑。
同样,DataSource的实现有很多,我们挑几个常见的,看下类图:

到这里,回顾下我们的问题,看看是不是都得到了解答。
此时,我们有以下几个疑问:
- 事务有传播性,这是如何实现的?
- 事务是数据库实现的,开启事务还得依赖数据库,那么操作数据库开启事务的代码在哪里?
- 数据库有很多种,如何区分的呢?
-
事务有传播性,这是如何实现的?
方法为
AbstractPlatformTransactionManager.getTransaction,根据事务定义的传播级别,来做判断处理。 -
事务是数据库实现的,开启事务还得依赖数据库,那么操作数据库开启事务的代码在哪里?
答案:接口PlatformTransactionManager的抽象实现AbstractPlatformTransactionManager,主要封装了事务的工作流,其中开启事务的核心入口
doBegin为抽象方法,交由子类实现。以常见的DataSourceTransactionManager为例,doBegin方法中依赖了DataSource接口的实现,通过DataSource.getConnection()获取数据库连接Connection对象,并做一系列的数据库事务开启操作。 -
数据库有很多种,如何区分的呢?
答案:Spring将事务的实现做了抽象。针对事务的工作流,提供了灵活的接口和抽象类,比如:接口PlatformTransactionManager、抽象基类AbstractPlatformTransactionManager,通过实现、继承来完成不同数据库的差异性。针对数据库的交互细节,提供了接口DataSource的定义,不同的数据源都可以进行自己的实现,来完成数据源的实现。
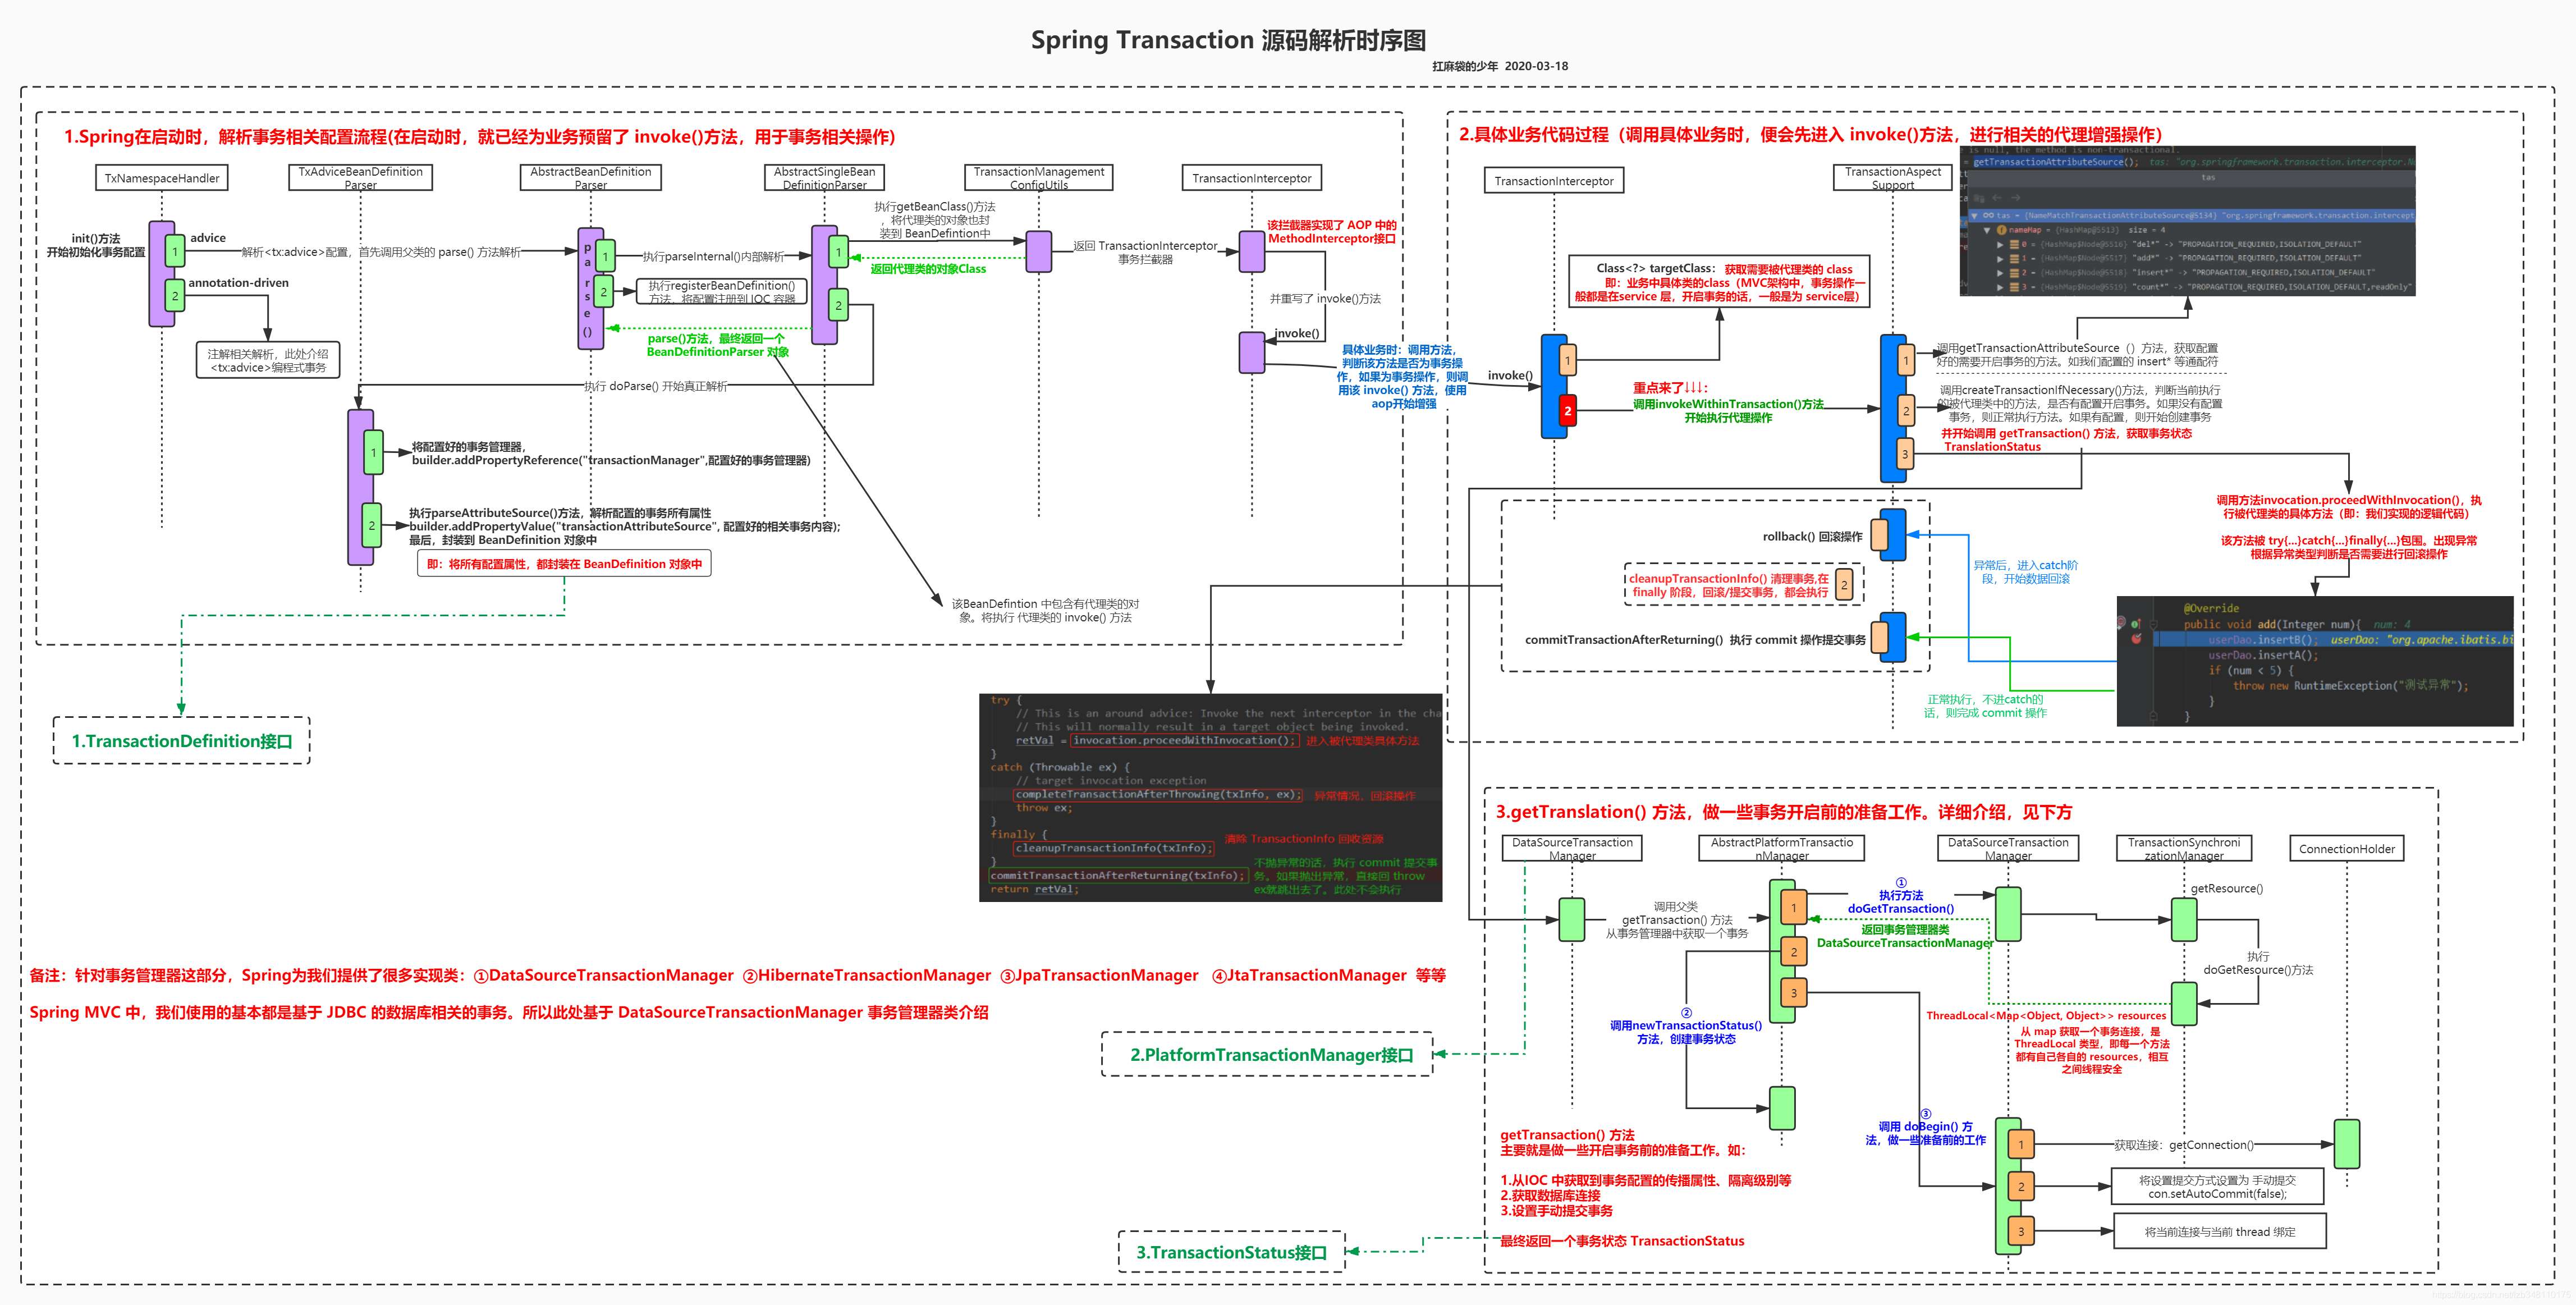
到此,你是不是对Spring事务的实现有所了解了呢?
最后,附上前辈画的一张图,辅助大家对Spring事务源码的理解: